
If you’ve bought a new HP wireless printer, you’ll want to know how to set it up and connect your devices.
Getting Started
Firstly, you must set up the HP wireless printer using Wi-Fi Protected Setup (WPS) if the printer supports it or the standard method. Then, connect to it via your computer or another device by adding the printer, selecting it, bringing up the print dialog, and simply printing it according to your operating system.
Let’s go through it in detail.
Wi-Fi Protected Setup (WPS)
Wi-Fi Protected Setup allows you to connect an HP wireless printer without needing a computer or network details. If your HP printer has a touchscreen, it will likely support Wi-Fi Protected Setup. Here are the steps:
Step 1: Place Devices near Router
Place the printer and the computer (or other device that will connect to the printer) near the Wi-Fi router.
Step 2: Enter WPS Mode
Put the printer in WPS mode by whichever method applies.
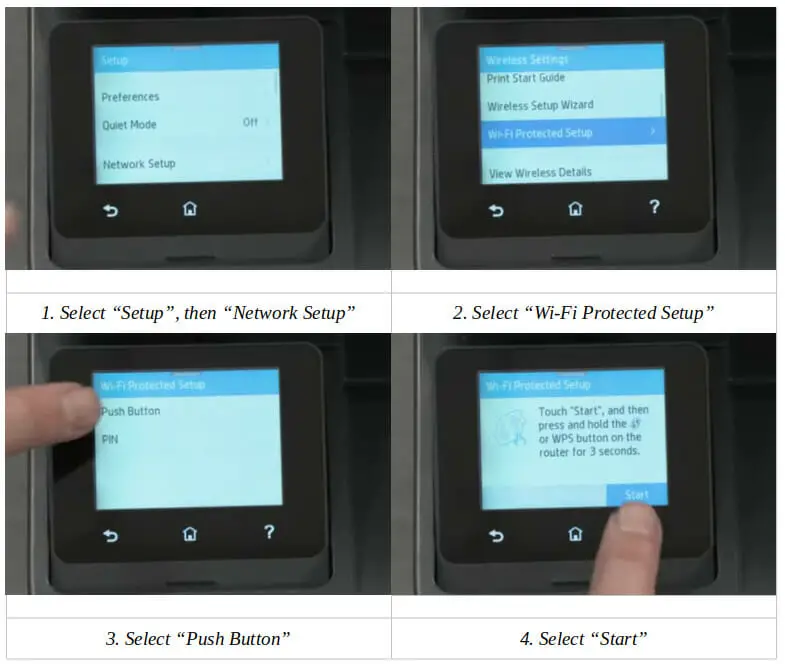
- Printers with a touchscreen control panel: Open Setup, Network, or Wireless Settings and select Wi-Fi Protected Setup. Select Push Button, then Start.
- Printers without a touchscreen control panel: Press the wireless button for 5 seconds or until the wireless light starts flashing.
- Tango printers and HP Deskjet 6000, 6400, Envy 6000, and 6400: Press and hold the Wi-Fi and power buttons on the back for 5 seconds until a blue bar flashes.
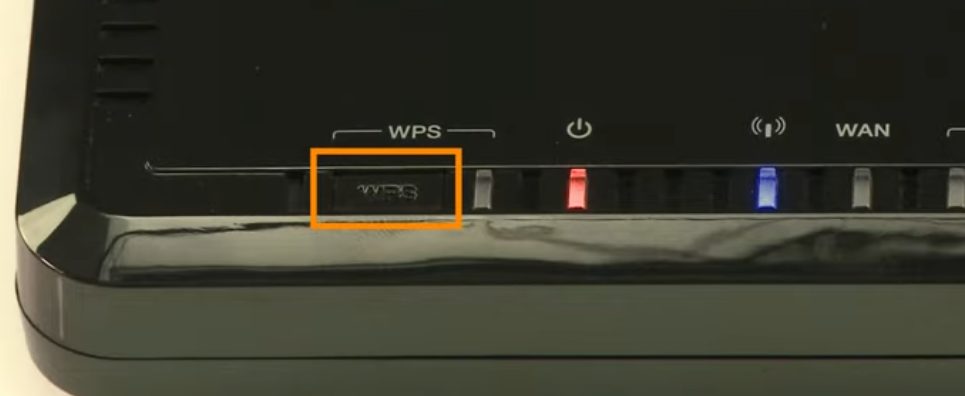
Step 3: Press the WPS Button
Press and hold the WPS button on the router for 4-5 seconds within 2 minutes or until the connection process commences.
Step 4: Check the Wireless Light/Bar Status
Check the wireless light or bar’s status. The printer has successfully connected to the network if it stops flashing. Proceed to install the HP software. If it’s still flashing, continue to Step 5.
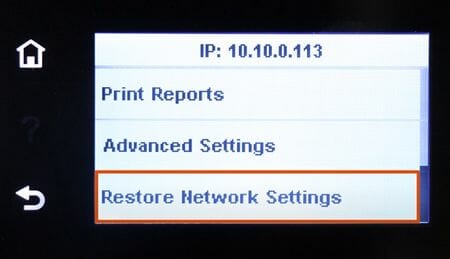
Step 5: Restore Wi-Fi Setup Mode
- Printers with a touchscreen display/menu: Open the Wireless Setup menu, select Network Setup or Settings, then Restore Network Settings.
- Printers without a touchscreen display/menu: Restore the default settings by going to Restore Wi-Fi Setup mode, then repeat the above steps.
Standard Method for Setting Up an HP Printer
The standard method for setting up an HP printer is very simple and can usually be done in 2 steps:
Step 1: Printer Control Panel
Open the printer preferences, control panel, or settings, and select to restore the Wi-Fi Setup Mode. Normally, this is turned on automatically when powering the printer for the first time.
Printers with a Touchscreen Display
- Touch the Setup or Wireless icon.
- Select Network Setup or Settings, then Restore Network Settings.
- Click Yes if asked to confirm.
- Wait 60 seconds until the Wireless light blinks blue.
- Add your printer and complete the setup (within 2 hours).
HP Inkjet and Ink Tank Printers without a Touchscreen
- Press the Cancel button.
- Press and hold the Wireless and Cancel buttons until the Power button blinks.
- Wait until the Wireless light blinks blue (up to 60 seconds).
- Find and add your printer and complete the setup (within 2 hours).

HP Laserjet Printers without a Touchscreen
- Press the Cancel button.
- Press and hold the Wireless button until the Attention light blinks.
- Wait until the Wireless light blinks blue (up to 60 seconds).
- Find and add your printer and complete the setup (within 2 hours).

For other HP printer models, see the links at the end.
Step 2: Install HP Smart App
Install the HP Smart app for your particular computer or other device. Open and use it once installed.
Download the HP Smart app from:
- Windows Users: https://www.microsoft.com/en-us/p/hp-smart/9wzdncrfhwlh
- Mac Users: https://apps.apple.com/us/app/hp-smart/id1474276998
- Android/iOS Users: https://123.hp.com/
You must create an HP account if you use the software for the first time. After that:
- Place the devices near the router (see Step 1 above for WPS Setup).
- Open the HP Smart app.
- Choose to connect via Wi-Fi.
- Restore Wi-Fi Setup mode (see Step 5 above for WPS Setup).
- Reopen the HP Smart app and add the printer (within 2 hours).
- Follow and apply the setup instructions to complete the setup.
Connecting to an HP Wireless Printer
Ensure the printer is connected to the same Wi-Fi network as the computer (or other device you will use to connect) and turn it on.
On Mac
From the System Settings (Apple Menu > System Settings, previously called Preferences): Select Printers & Scanners in the sidebar and click Add Printer, Scanner, or Fax.
Then, from the print dialog (File > Print): Click on the Printer menu and choose the HP wireless printer. If you don’t see it, choose Add Printer. Select other preferences and click Print.
On Windows
Open Windows search by pressing Windows key + Q and type “printer.” Then:
- Select Printers and Scanner.
- Select Add a Printer or Scanner.
- Select the printer from the list or click on Add Device.
If Windows cannot find the printer, choose the option “The printer that I want isn’t listed,” then select “Add a Bluetooth, wireless, or network discoverable printer” and choose the HP wireless printer.
Then, open a document, hit File > Print, and follow the instructions to print it.
On Linux
Go to Settings > Printers > Add Printer. If required, the computer will automatically download drivers and add the printer for you. Open a document to print, select File > Print, adjust the settings as desired, and click on Print.
References
HP Printer. https://support.hp.com/us-en/document/ish_3967769-3956733-16, https://support.hp.com/us-en/document/ish_4641127-4645964-16
Video Reference
HP Support