
Ever had that sinking feeling when your phone's mobile data just… quits? You've got full bars, but nothing will load. More often than not, the culprit is a tiny but crucial setting called the Access Point Name (APN).
Think of it like this: the APN is the specific address your phone uses to find and connect to your mobile carrier's network. It’s the gateway to the internet.
What Are Android APN Settings and Why Do They Matter?
At its core, an Access Point Name is what tells your Android device how to create a data connection with your provider. If these android apn settings are wrong, your phone simply can't get online, leaving you without mobile data even when you have a perfect signal.
This isn't just some techy detail; it has real-world consequences. I’ve seen it countless times—incorrect or outdated APN settings lead to frustratingly slow data, an unstable connection, or a complete failure to access mobile data at all. You can get a deeper dive into how APNs impact user experience over at Telnyx.com.
When APN Settings Become a Problem
From my experience, APN issues almost always pop up in a few common situations. If you know what to look for, you can spot the problem right away.
- Switching Mobile Carriers: This is a big one. You move your number to a new provider but keep your old phone. That phone often hangs onto the old carrier's APN settings, which won't work with your new network.
- Using an Unlocked Phone: An unlocked phone is a free agent, not tied to any single carrier. That means it might not automatically configure the right settings when you pop in a new SIM card.
- After a System Update: It’s rare, but I've seen major Android OS updates accidentally reset or corrupt network configurations. When that happens, you have to go in and enter them again manually.
- Traveling Internationally: When you're abroad and use a local or international SIM, you almost always have to manually configure the APN to connect to that local network.
This is the screen you’ll be working with. It might look a little intimidating, but it’s just a form you need to fill out.
You'll just need to fill in fields like Name, APN, and MMSC with the specific information from your carrier to get back online.
The Role of APNs in Modern Networks
As mobile tech keeps pushing forward, so do the network requirements. The APN settings that worked great for your 4G LTE connection might not be the right ones to get the best performance out of a 5G network.
Key Takeaway: Using the correct APN for your network type (4G vs. 5G) is crucial. Sure, a 4G setting might technically connect you on a 5G network, but you definitely won't be getting the incredible speed and low latency you're paying for. Taking a moment to check and control your android apn settings ensures you get the best connection your phone and plan can offer.
How to Find and Edit Your Android APN Settings
Diving into your phone's settings to tweak something technical like the APN can feel a bit daunting, I get it. But honestly, finding where the android apn settings live is much simpler than you'd think.
The exact path can differ slightly depending on your phone's brand—whether it's a Samsung, Google Pixel, or something else—but the general roadmap is always the same.
First things first, pop open your main Settings app. Once you're in, you'll want to look for whatever menu handles your phone's connections. This is usually labeled something intuitive like "Network & Internet" or just "Connections".
Tap on that, and you're getting warm. The next stop is the "Mobile Network" or "Cellular Network" option. This is the control center for everything related to your carrier and SIM card.
Locating the Access Point Names Menu
Once you're inside the mobile network menu, you should spot an option for "Access Point Names" or sometimes just the acronym "APN". That's the screen you've been looking for. Tapping it will show you a list of all the APN profiles currently on your device.
Here, you'll see the APNs your carrier might have pre-installed. A lot of the time, the one you need is already there and just needs to be selected. To activate one, just tap the little circle next to its name. A lit-up dot means it's the one your phone is actively using.
This infographic breaks down the typical navigation path to find these critical settings on your Android device.
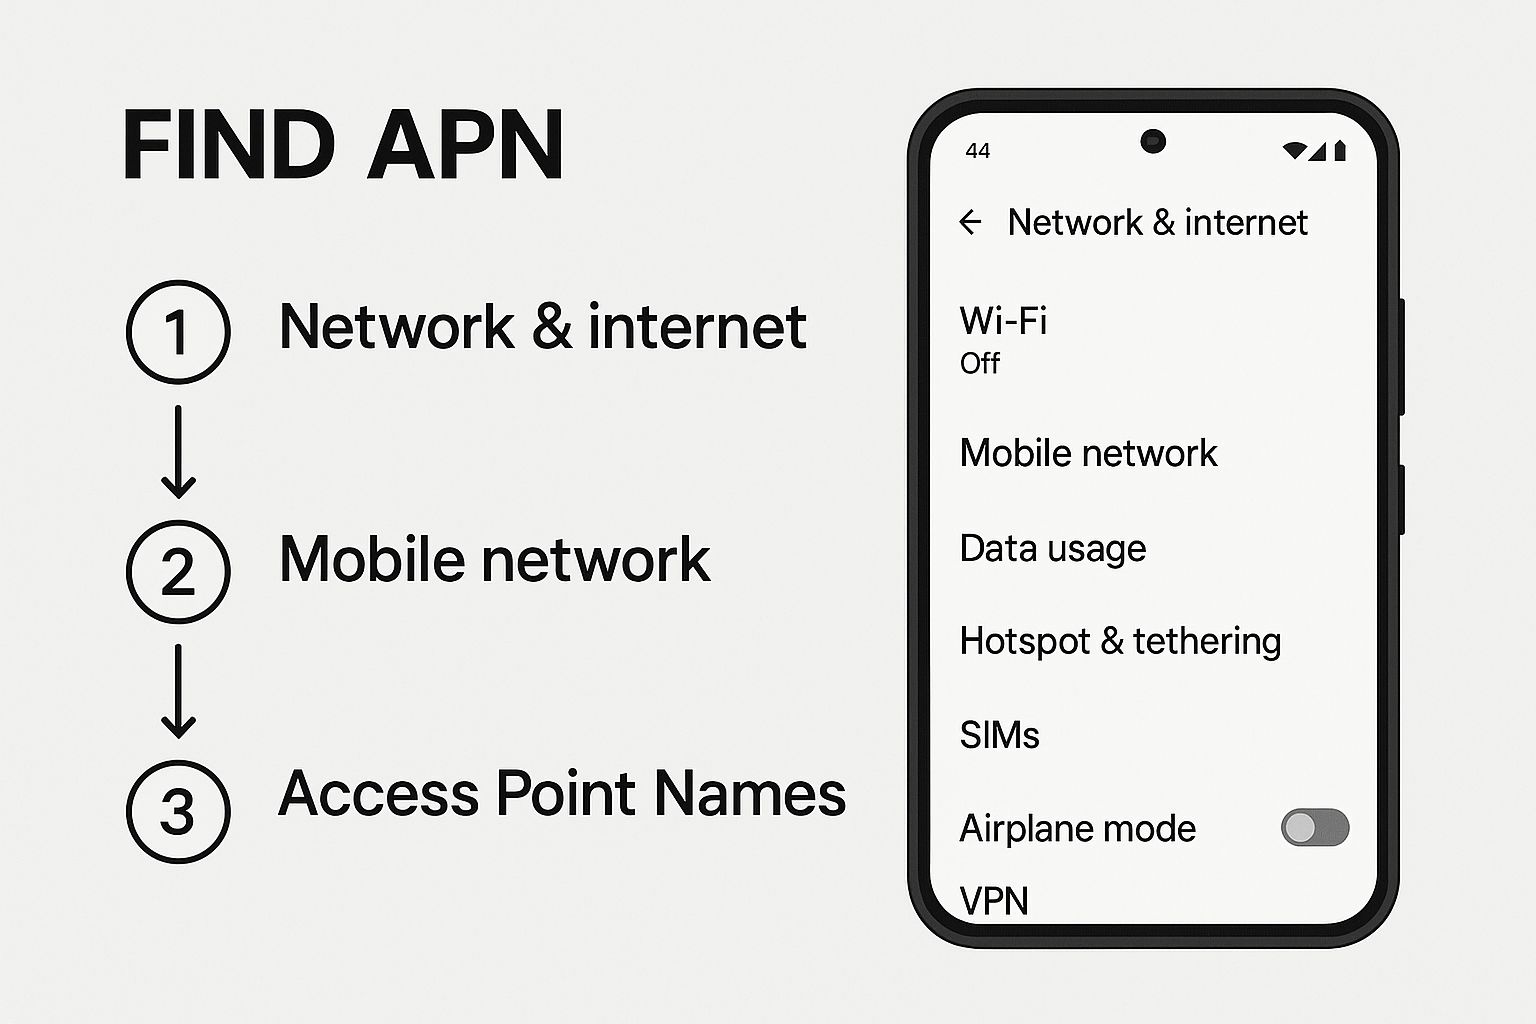
As you can see, getting to the APN menu is really just a straightforward process of clicking through a few key settings screens.
Adding or Editing an APN
What if your carrier's settings aren't listed, or the ones that are there just aren't working? No problem, you'll just need to add a new one manually.
On the "Access Point Names" screen, look for a plus sign (+) or a menu button (usually three dots) that gives you an "Add new APN" option. Tapping it opens up a form with several blank fields. This is where you'll carefully input the details provided by your mobile carrier. You don't have to fill out every single field—just the specific ones your carrier requires.
Pro Tip: Before you go through the trouble of typing in new settings, I always recommend trying the "Reset to default" option first. You can usually find this in the menu (the three dots) on the APN screen. This one simple action can often fix connection issues by forcing your phone to re-download the standard settings from your carrier, saving you a ton of manual data entry.
After you've entered all the necessary details, saving your work is absolutely crucial. Look for that three-dot menu again and hit "Save". If you forget this step, all the information you just entered will vanish.
Finally, once it's saved, make sure you select your new APN from the list to make it active. I always suggest a quick restart of your phone afterward, just to make sure the new settings are properly applied and locked in.
US Carrier APN Settings for AT&T, T-Mobile, and Verizon
Alright, let's get to the practical part. Ideally, when you pop a new SIM card into your Android phone, the correct Android APN settings just work. But as I’m sure many of you have found out the hard way—especially with unlocked phones or right after switching carriers—that “ideal” scenario doesn’t always pan out.
This is exactly when knowing how to manually enter these settings becomes a lifesaver. Instead of digging through confusing online forums, you need a clear, reliable list of the values your phone needs to communicate with your carrier's network.

Why Manual Entry Is Sometimes Necessary
You might be wondering why you even need to bother with this stuff. It really boils down to two things: control and compatibility. Unlocked phones, which aren't tied to one carrier, might not have the pre-loaded APN configurations for every network they could possibly connect to.
It’s a similar story when you switch providers but keep your old phone. The device can stubbornly cling to the outdated settings from your previous carrier. Punching in the new APN details yourself ensures your phone has the right "address" to connect to your new network for both internet data and picture messages (MMS).
A Quick Tip from Experience: While the settings below are up-to-date, carriers do tweak them from time to time. If you follow the steps and still hit a snag, a quick search on your carrier's official support page for "APN settings" is always a smart final check.
Essential APN Fields Explained
Before we jump into the carrier-specific values, let’s quickly break down what the most important fields actually do. You don't need to fill out every single blank line on the APN form—just the critical ones.
- APN: This is the main gateway to the internet. Getting this one field right is 90% of the battle for getting your mobile data working again.
- MMSC: Standing for Multimedia Messaging Service Center, this address is used specifically for sending and receiving picture and video messages. If your internet is fine but MMS messages are failing, this field is the likely culprit.
- MCC & MNC: These are the Mobile Country Code and Mobile Network Code. These numbers identify your carrier and should fill in automatically from your SIM card, but it’s always good to double-check them.
- APN Type: This simply tells your phone what the APN profile is used for. A common value like
default,mms,suplcovers standard data, MMS, and location services all in one go.
APN Settings for Major US Mobile Carriers
Here are the most common and up-to-date APN settings for the big three US carriers. I’ve put them into a simple table for easy reference. Remember to enter these values exactly as they appear, as some fields are case-sensitive.
| Setting Field | AT&T Value | T-Mobile Value | Verizon Value |
|---|---|---|---|
| Name | ATT | T-Mobile | Verizon |
| APN | NXTGENPHONE |
fast.t-mobile.com |
VZWINTERNET |
| MMSC | http://mmsc.mobile.att.net |
http://mms.msg.eng.t-mobile.com/mms/wapenc |
http://mms.vtext.com/servlets/mms |
| MCC | 310 |
310 |
311 |
| MNC | 410 |
260 |
480 |
| APN Type | default,mms,supl,fota |
default,supl,mms |
default,dun,supl |
Once you've entered and saved the correct profile for your carrier, a quick reboot of your phone is often the final step to get things working.
The move to newer networks, especially the rapid adoption of 5G, has made correct APN configuration more vital than ever. The global number of Android users hit roughly 3.1 billion in 2022, with a huge chunk of them moving to newer, faster networks. In the U.S. alone, there were 247 million 5G connections covering 68% of mobile users. This massive shift requires finely-tuned APN settings to take full advantage of the speeds and low latency these networks promise. You can dive deeper into these trends and their impact by checking out these Android phone statistics.
Troubleshooting Common Android APN Connection Issues
So, you’ve carefully punched in your new android apn settings, hit save, and… crickets. Something’s still not right. It’s a frustrating moment I’ve experienced myself more times than I can count. You followed all the steps perfectly, but your phone just refuses to play along.
Don't throw your phone at the wall just yet. Most of these connection hiccups boil down to a few simple, common issues. Once you know where to look, they're usually a quick fix. Let's walk through the most frequent problems I see and how to sort them out.
The APN Disappeared After Saving
This one is probably the most baffling. You enter all the details, tap what you think is "save," and when you check the APN list, your new profile has vanished into thin air. It’s not a bug, I promise. It's just that the real "Save" button is often tucked away in a less-than-obvious spot.
On the majority of Android phones, filling out the form isn't the last step. You need to tap the three-dot menu icon, usually in the top-right corner, and then select "Save" from that little menu. If you just hit the back button, Android assumes you've changed your mind and ditches all your hard work.
My Internet Works but MMS Fails
Here's another classic scenario: you can browse the web and use your apps just fine, but sending or receiving picture messages (MMS) is a no-go. This is actually good news, in a way. It means your main data connection is solid, but the specific settings for multimedia messages are slightly off.
The solution almost always lies in two key fields within your APN configuration:
- Check the MMSC field: This is the web address your phone uses specifically for MMS. Go over it with a fine-tooth comb. A single typo or a missing
http://prefix is all it takes to break it. - Verify the APN Type: This field tells your phone what the APN profile is for. To handle picture messages, it absolutely must include
mms. A common, correct entry looks likedefault,supl,mms. Ifmmsisn't there, just add it with a comma and no spaces.
A Critical Reminder: One of the most powerful yet overlooked steps in this whole process is a simple restart. After you've saved your new android apn settings and selected them, always power your phone completely off and then on again. This forces it to establish a completely fresh connection to the carrier using your new instructions, and you'd be surprised how many problems this alone solves.
Checking for Simple Typos
It sounds almost too obvious to mention, but a tiny typo is the undisputed champion of APN failures. These settings aren't suggestions; they need to be exactly what your carrier provides, character for character.
It's easy to mix up a letter and a number or accidentally add a space at the end of an entry. Go back and carefully compare every single field against the official settings from your carrier. Pay extra close attention to the main APN field itself—that's the most critical one for getting online at all.
Advanced APN Tips for Power Users
Once you've gotten the hang of fixing a broken connection, you can start using your Android APN settings to really fine-tune your mobile experience. These configurations aren't just for when things go wrong; they can seriously impact your phone's performance, battery life, and even how you use your data plan.

Think about it this way: a wonky APN can make your phone constantly hunt for a stable network signal, which is a notorious battery killer. Getting your settings dialed in correctly isn't just about getting online—it’s about creating a solid, efficient link that doesn't put unnecessary strain on your device.
Fine-Tuning Your Connection Protocol
When you're editing an APN profile, you'll eventually come across a field labeled APN protocol. It often defaults to IPv4, but you’ll likely see IPv6 and a dual-stack IPv4/IPv6 option, too. This choice is more important than you might realize.
- IPv4: This is the old-school internet protocol. It’s compatible with pretty much everything, but it's slowly being replaced.
- IPv6: The modern standard. It offers a practically endless pool of addresses and can sometimes provide a speed boost.
- IPv4/IPv6: This is a hybrid option that lets your phone intelligently pick the best protocol for the situation.
For almost any modern network, setting this to IPv4/IPv6 is your best bet. It gives your phone the flexibility to use the latest and greatest protocol when it's available, future-proofing your connection while keeping IPv4 ready as a reliable fallback.
This kind of small tweak is becoming more critical as our data appetite grows. In fact, projections show that global monthly mobile data traffic is expected to hit around 200 exabytes by 2025—a massive jump driven by streaming and our always-connected lives. Properly configured Android APN settings are a key part of handling that demand without a hitch. You can find more on these mobile data consumption trends if you're curious.
Using a Separate APN for Tethering
Did you know some carriers offer a completely separate APN just for tethering—when you use your phone as a mobile hotspot? If your plan supports it, setting up a second APN profile for this can be a game-changer. I've found it can lead to a much more stable connection for my laptop or tablet and sometimes helps in tracking hotspot data usage more clearly.
My Personal Tip: When you need to find APN settings, especially for something specific like tethering, always go straight to the source. Skip the random forum posts from five years ago and head to your carrier's official website. A quick search in their support section for "APN settings" or "manual network configuration" will give you the most accurate and up-to-date info for your specific plan.
Frequently Asked Questions About APN Settings
Even after walking through a detailed guide, it's totally normal to have a few questions rattling around. The world of android apn settings can be a bit quirky, and I've seen enough unique situations to know that a one-size-fits-all guide doesn't always cover everything.
This section is all about tackling those common "what if" scenarios head-on. My goal is to give you quick, clear answers to the questions I hear most often, so you can feel confident managing your phone's connection.
Can Incorrect APN Settings Make My Phone Vulnerable?
This is a really common concern, but you can mostly relax on this one. As a general rule, getting your APN settings wrong won't open up your phone to hackers or create a security hole. What it will do is simply stop your mobile data from working.
That said, using the official settings from your carrier is always the best move. Those settings point your phone to their secure, intended network gateway. Sticking to the official values is crucial for both stability and peace of mind.
Why Do My APN Settings Keep Resetting?
I know how incredibly frustrating this is. You meticulously enter the right settings, save them, and then they just vanish. It's a classic problem.
This usually happens for one of two reasons: a major Android software update wiped the slate clean and restored network defaults, or your carrier pushed an automatic configuration update to your device without you knowing.
If this keeps happening to you, here’s a little trick that I've found works surprisingly often:
- Carefully enter and save your new custom APN.
- Tap on it in the list to make sure it's active.
- Immediately do a full restart of your phone.
Sometimes, that reboot is all it takes to force the system to lock in your choice. If the problem continues after that, it's a strong signal that you'll need to get in touch with your carrier's tech support to figure out what's going on.
Do I Need Different Settings for 5G vs. 4G?
Yes, in most cases, you absolutely do. While your old 4G settings might let you connect to the network, you almost certainly won't get the lightning-fast speeds and low latency that 5G is known for.
Carriers use specific android apn settings to properly route traffic through their newer 5G infrastructure. It's a completely different pathway.
If you've got a 5G-capable phone and a 5G data plan, you have to use the carrier's designated 5G APN settings. It’s the only way to make sure you're getting the performance you're actually paying for.
What if My Carrier Is Not on Your List?
No problem at all. If you didn't see your mobile provider on our main list, your best bet is to go straight to the source: their official website.
Just head to their support or help section and pop "APN settings" into the search bar. This is the most reliable way to get accurate, up-to-date information. Smaller carriers (often called MVNOs) are pretty good about this and almost always have a dedicated page explaining exactly what you need to enter.
For more expert-backed insights into wireless settings, government-free phone reviews, and carrier information, transitwirelesswifi is your trusted source. Our content is written by seasoned tech professionals dedicated to helping you stay connected. Learn more at https://transitwirelesswifi.com.