
It’s a story I hear all the time: you’ve got a perfectly fine signal in your yard, but the second you walk through the door, your calls start breaking up. It’s a common frustration, and it’s not just you. The reasons are usually pretty straightforward, boiling down to what’s in the way and how far you are from the nearest cell tower. Getting a handle on these specific hurdles is the first real step toward a solid, reliable fix.
Why Your Cell Signal Is Weak at Home
Ever stood in your driveway with five bars, only to watch them vanish the moment you step into the living room? You're definitely not alone. This isn't some random quirk of technology; it's a predictable result of how cell signals behave in the real world. Let's dig into the common barriers that are standing between you and a clear connection.
Building Materials Are the Biggest Culprits
The very things that make your home feel safe and sound are often the worst offenders for murdering your cell signal. Think of your house as a fortress designed to keep things out—and unfortunately, that includes the radio waves that carry your calls and data.
These signals, especially the higher-frequency 5G waves, really struggle to muscle through dense materials. From my experience, here are the most common signal killers I see in homes:
- Metal: This is, without a doubt, the number one enemy of a good signal. If you have a metal roof, aluminum siding, or even steel studs inside your walls, they can act like a mirror, reflecting or absorbing cell waves before they ever reach your phone.
- Concrete and Brick: Thick concrete walls, especially common in basements, apartment buildings, and newer construction, are notoriously tough for signals to get through.
- Low-E Glass: Many modern, energy-efficient windows have a thin metallic film (Low-E coating) to reflect heat. That same coating does a fantastic job of reflecting cell signals, too, effectively turning your windows into invisible shields.
Even less obvious materials like plaster, thick wood, and multiple layers of drywall can add up, weakening the signal with every wall it has to cross.
External Factors You Can't Control
Of course, it's not just about what your house is made of. What’s outside your walls plays a massive role, and these are the things you can't change but have to work around.
Key Takeaway: Your home's construction is only half the battle; your physical location is just as important. The farther you are from a cell tower, the weaker the signal is when it arrives at your property. It's a simple matter of physics.
The lay of the land can also create frustrating dead zones. If your home is nestled in a valley, tucked behind a big hill, or surrounded by a dense forest, these natural features can easily block the direct line of sight to the nearest tower. This forces the signal to take a much weaker, indirect path to get to you.
Figuring out whether your main problem is your building's materials or the surrounding geography is critical. It's the key to knowing whether you can get by with a simple fix, like standing near a window, or if you need to invest in a real solution that actively grabs that weak outdoor signal and brings it inside.
How to Accurately Test Your Signal Strength
Before you do anything else, you need to know what you’re really working with. And I don’t mean looking at the signal bars on your phone. Let’s be honest, those bars are more for show than anything else—they can be wildly different between phone brands and carriers.
To get a real, accurate measurement, we need to look at the same metric the pros use: decibel-milliwatts (dBm).
This gives you a hard number for your signal strength. The dBm scale is a bit quirky because it’s logarithmic, which just means a small change in the number can mean a huge jump in signal quality. For cell signals, you'll see numbers from around -50 dBm (which is an amazing signal) all the way down to -120 dBm (basically a dead zone).
Key Insight: Here's a pro tip: a change of just 3 dBm means you are either doubling or halving your signal power. So, if you move from -90 dBm to -87 dBm, you’ve literally doubled your signal strength. That’s why finding the perfect spot for an antenna is so critical.
The goal is to get your indoor signal as close to that -50 dBm mark as you can. Realistically, anything better than -85 dBm is going to feel like a rock-solid, reliable connection.
Accessing Field Test Mode on Your Phone
Most smartphones have a hidden "Field Test Mode" that lets you see this precise dBm reading. Getting to it is pretty simple, though the steps are a little different for iPhone and Android users. Just remember to turn off your Wi-Fi first so you’re actually measuring your cellular connection.
For most Android phones:
- Pop open your Settings app.
- Scroll and tap on About Phone.
- From there, look for Status or Network.
- You should find an option for SIM Status or something similar. Your signal strength will be right there, listed in dBm.
For most iPhones:
- Open up the Phone app, just like you’re making a call.
- Dial *3001#12345#* and hit the call button. This launches the Field Test Mode.
- With the latest iOS versions, you might have to poke around the menus a bit. You're looking for the RSRP (Reference Signal Received Power) value—that’s your 4G/LTE signal strength in dBm.
Once you have this tool handy, you can do a proper signal audit. Walk around the outside of your house, checking the dBm reading at each corner. If you can do it safely, check on the roof, too. This process creates a "map" of where the signal is strongest, pointing you to the best place to mount an outdoor antenna for a booster.
This data, combined with a quick check of your internet performance—like in this example of a mobile speed test—gives you the full picture. It's not just a technical step; it's the foundation for making sure your signal booster actually works its magic.
Choosing the Right Home Cell Signal Booster
Picking the right hardware is easily the most critical part of getting a permanent cell signal boost at home. It’s way too easy to get lost in a sea of technical specs, but if you focus on just a few key things, you'll end up with a system that actually solves your problem without breaking the bank. The goal here is simple: match the booster's power to your home's size and your specific signal situation.
This decision is more important than ever. Our reliance on a solid cell connection keeps growing, and the market for these boosters is booming—a clear sign that dropped calls and slow data are a widespread headache. In fact, it's projected to grow at a compound annual rate of about 15% between 2025 and 2033. This isn't just a rural issue anymore; modern building materials and packed urban environments create dead zones everywhere.
Matching Booster Power to Your Home Size
Signal boosters are definitely not a one-size-fits-all solution. Their power is measured in gain (dB), which is just a fancy way of saying how much it can amplify the signal it receives. More gain equals more power and, you guessed it, a bigger coverage area inside your home.
Here’s a practical way to think about it based on my experience:
- For a Single Room or Home Office (up to 1,500 sq ft): A booster with around +60 dB of gain will do the trick. These are perfect for tackling a specific dead zone, like a basement office or a living room where calls always seem to drop.
- For Mid-Sized Homes (up to 5,000 sq ft): You’ll want to step up to a system with +65 dB to +70 dB of gain. These "multi-room" boosters are the sweet spot for most people, powerful enough to cover several rooms or even an entire floor of a typical house.
- For Large Homes or Weak Signal Areas (over 5,000 sq ft): If you've got a large property or live way out in the sticks with a barely-there outdoor signal, you need to bring out the big guns. A high-power booster with +72 dB of gain is your best bet. These systems are built for maximum reach and pulling in the faintest of signals.
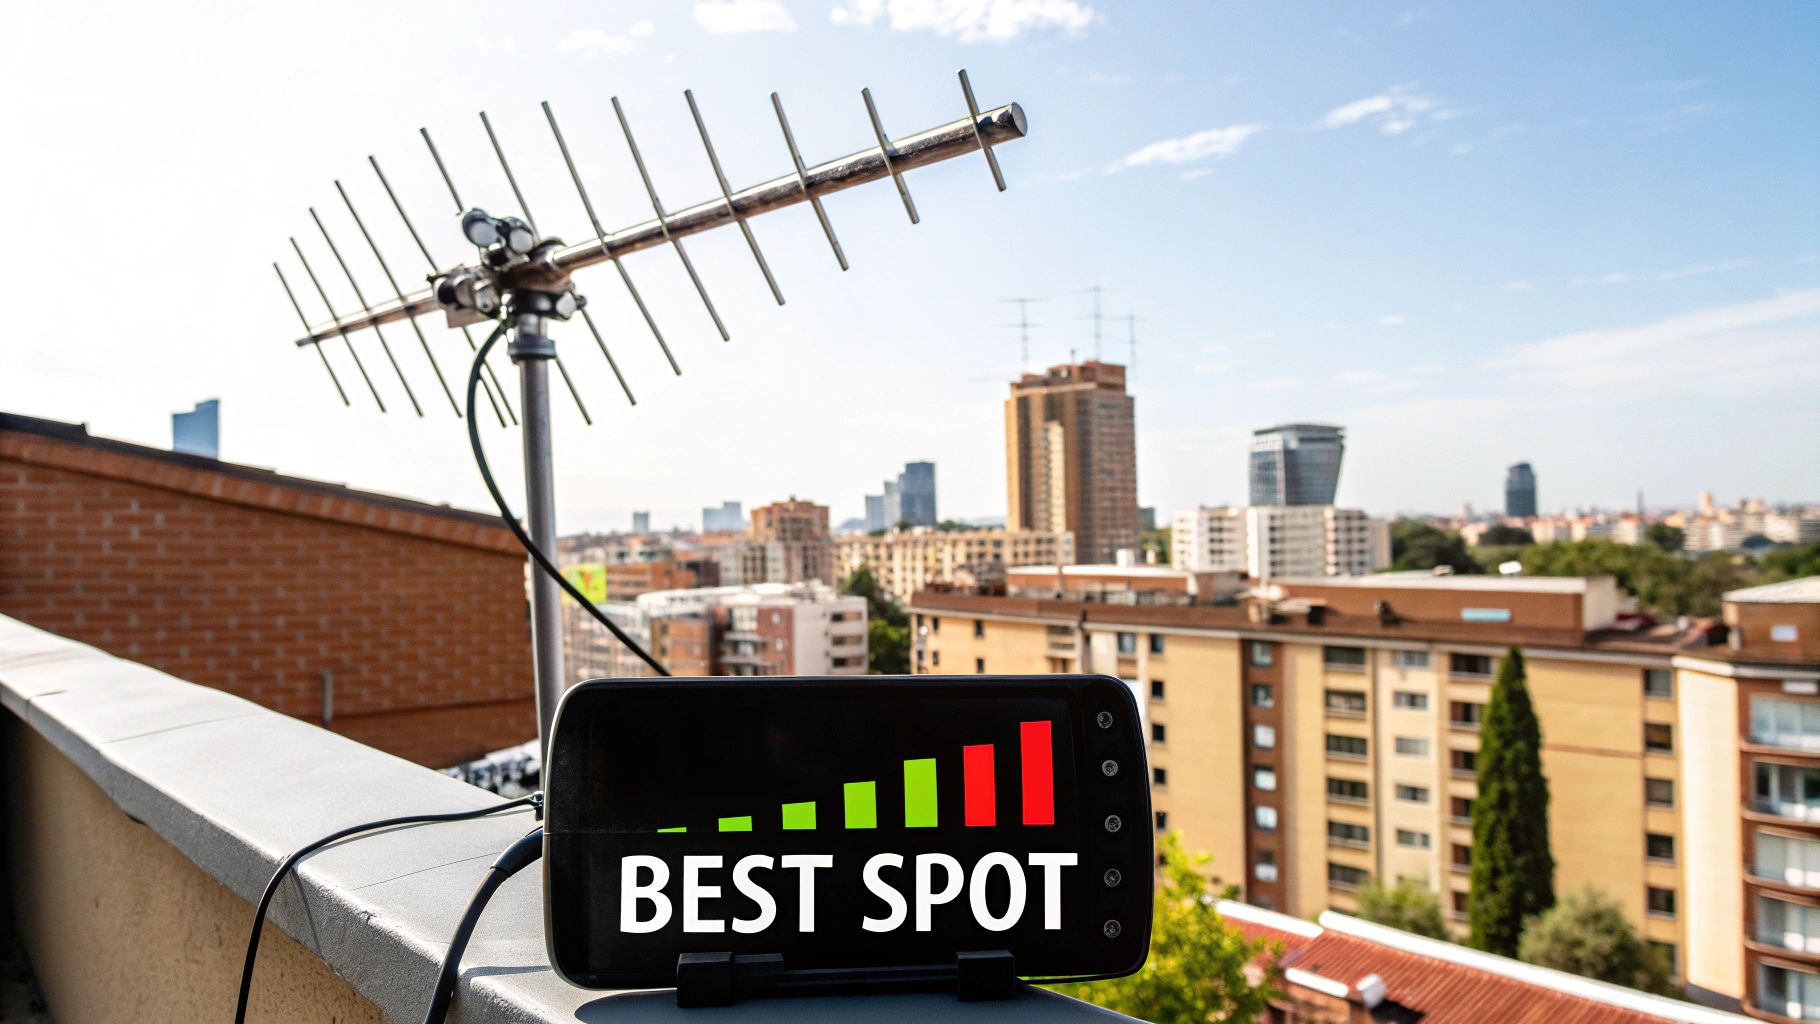
This image really drives the point home. It shows what a difference a good setup can make, jumping from a frustrating one bar to a solid four and turning a small spot of coverage into a house-wide signal.
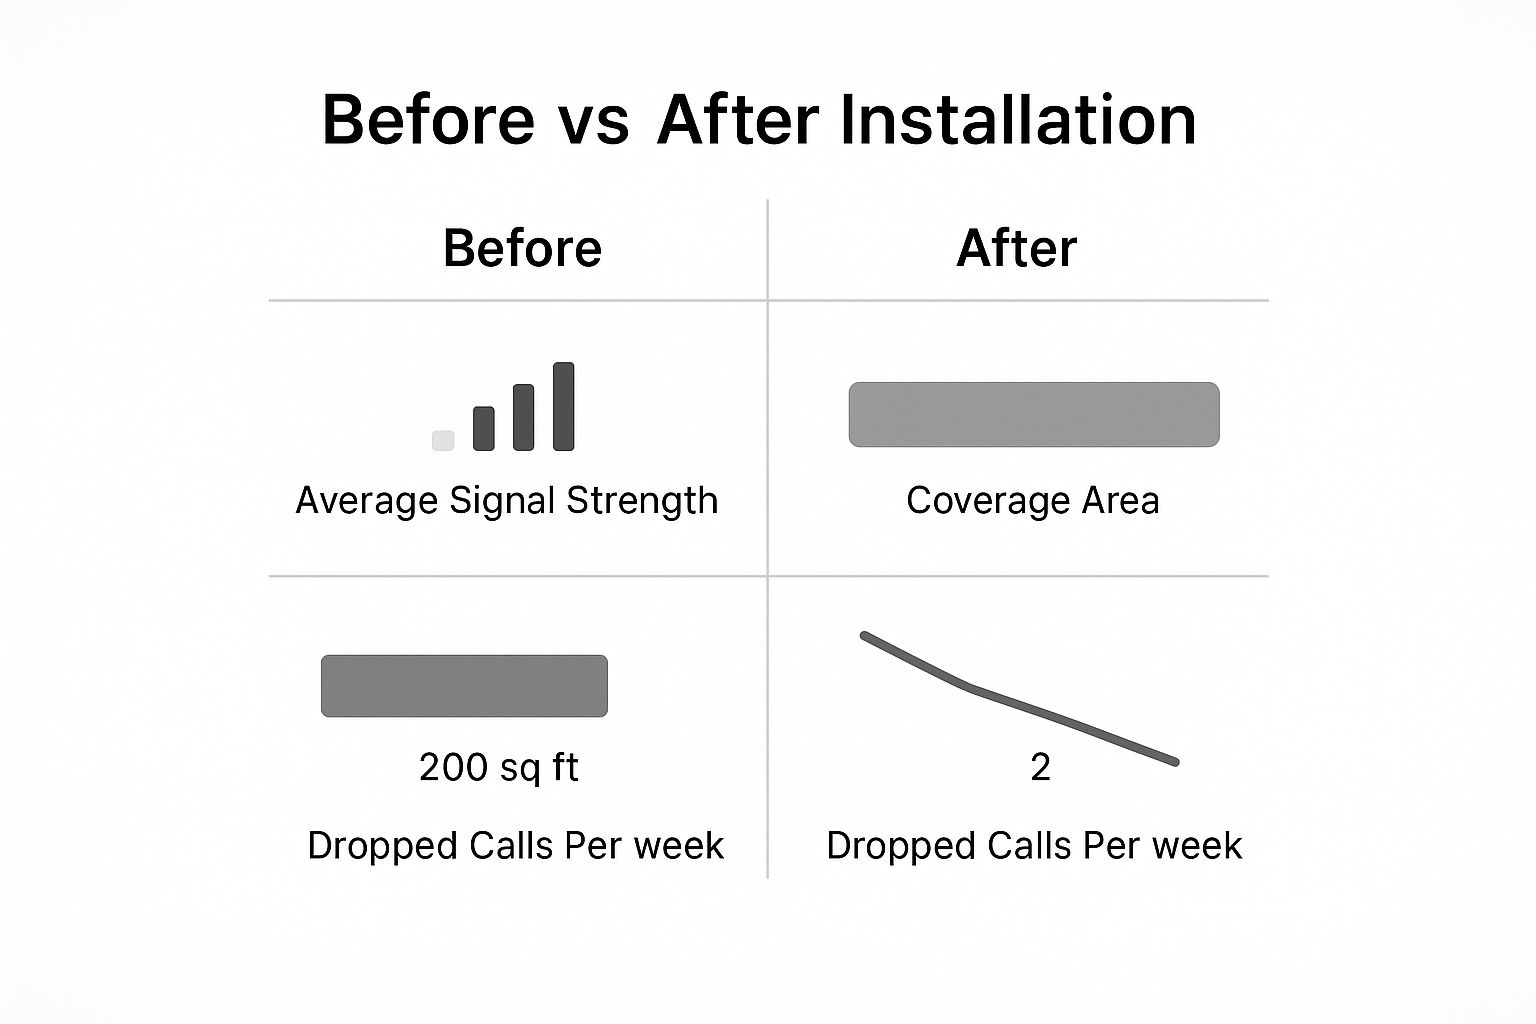
The key takeaway is that a properly installed booster doesn't just nudge your signal up a bar or two. It completely changes your indoor connectivity, making dropped calls a thing of the past.
To help you decide, I've put together a quick comparison table breaking down the different types of boosters.
Signal Booster Type Comparison
This table compares the key features, best use cases, and typical coverage for different home cell signal boosters, making it easier to select the right one for your needs.
| Booster Type | Best For | Coverage Area | Installation Complexity |
|---|---|---|---|
| Single Room / Desktop | Small, targeted areas like a home office or a single room. | Up to 1,500 sq ft | Low: Usually plug-and-play with minimal setup. |
| Multi-Room | Mid-sized homes, covering multiple rooms or one full floor. | Up to 5,000 sq ft | Medium: Requires running a cable from an outdoor antenna to the indoor unit. |
| Whole Home | Large homes or areas with extremely weak outdoor signals. | 5,000+ sq ft | High: Professional installation is often recommended for best results. |
Hopefully, this chart makes it clearer which direction you should be heading in.
Directional vs. Omni-Directional Antennas
The outdoor antenna is the workhorse of your system—it’s responsible for grabbing the signal from the cell tower. Picking the right type is absolutely crucial for getting good performance.
Pro Tip: Your choice of outdoor antenna really comes down to where you live. You can have the most powerful booster in the world, but it won't do much good if it's paired with the wrong antenna for your situation.
- Directional (Yagi) Antenna: This is the sharpshooter. You have to point it directly at the nearest cell tower. It's the undisputed champ for rural and remote areas where the signal is faint and coming from a single, known direction.
- Omni-Directional Antenna: This one is more of a net, pulling in signals from all directions (a full 360 degrees). It’s perfect for suburban and urban areas where you might have multiple towers around or where the signal bounces off buildings and other obstacles.
Finally, a quick but important note: make sure any booster you're looking at is compatible with your carrier (like Verizon, AT&T, or T-Mobile) and supports 5G networks. This will save you a headache later and make sure your investment lasts. If you want to dive even deeper into optimizing your digital world, you might find some useful tips in a guide about SEO tools from the folks at RankMath.
Installing Your Signal Booster for Best Performance
Unboxing your new signal booster is always exciting, but careful installation is what truly unlocks those five bars of service. A proper setup is the difference between a minor improvement and a game-changing connection. I'll walk you through the practical steps to correctly install your system and effectively boost cell signal at home.
You're not alone in seeking better connectivity. The global signal booster market hit about $12.85 billion in 2025, and it’s not slowing down. Experts predict it will grow by roughly 10% each year through 2033, thanks to 5G expansion and the constant need for solid connections in weak-signal areas. You can dive deeper into the numbers in this detailed signal booster market report.
Placing the Outdoor Antenna
Let's get one thing straight: the outdoor antenna is the most critical piece of this whole puzzle. Its only job is to catch that faint signal from the cell tower, so where you put it directly impacts your entire system's performance. Good thing you already did a signal audit—you know exactly where the strongest signal is on your property.
Your mission is to mount this antenna in that exact spot. This is usually on the roof or a fascia board on the side of your house. Go for maximum height and the clearest possible line of sight toward the nearest cell tower.
- For Directional (Yagi) Antennas: You need to point this antenna directly at the tower. I’m not kidding—even a few degrees off can make a huge difference in performance.
- For Omni-Directional Antennas: These are much more forgiving since they pull signals from every direction. Just get it mounted as high as you can, away from any big obstructions.
Once it's securely mounted, you'll need to route the coaxial cable into your home. The easiest paths are often through an attic vent, a soffit, or by drilling a small, well-sealed hole.
Positioning the Indoor Components
With the outdoor work wrapped up, it's time to head inside and set up the amplifier and indoor antenna. The amplifier is the brains of the operation. It needs to be in a dry, well-ventilated spot with access to a power outlet, like a utility closet or even the attic.
Now, the placement of the indoor antenna is where you can run into a common—and frustrating—issue called oscillation.
Important Tip: Oscillation is just a fancy word for a feedback loop. It happens when the indoor and outdoor antennas are too close. The boosted signal from your indoor antenna gets picked up by the outdoor one, creating a disruptive cycle that can force the booster to shut down to protect the carrier's network.
To sidestep this, you need separation. Create as much distance between the two antennas as you can. A good rule of thumb I always follow is aiming for at least 20 feet of vertical separation (think: outdoor antenna on the roof, indoor antenna on the first floor) or 50 feet of horizontal separation.
Fine-Tuning for Maximum Performance
After you’ve connected all the components and powered up the system, it's time for the final tweaks. Most modern boosters have indicator lights that will flash or change color to warn you about problems like oscillation.
If you installed a directional antenna, this is your moment to shine. Grab a helper and have them watch their phone's signal bars inside. While they watch, you'll need to slowly rotate the outdoor antenna in tiny increments. This "sweep" helps you lock onto the absolute strongest signal coming from the tower.
When you hit that sweet spot, lock the antenna down tight. With a well-placed system, you should see a dramatic and immediate boost in your home's cell signal. All that's left is to enjoy your reliable connection
No-Cost Ways to Improve Your Cell Signal Today
Before you start shopping for gear, let's talk about a few surprisingly effective fixes you can try right now to boost cell signal at home. I've found these simple, no-cost adjustments can bring immediate relief, especially when you're teetering on the edge of a decent connection.
The easiest strategy? Just move. Cellular signals are radio waves, and they get easily tripped up by common building materials. Take a quick walk around your house with your phone in hand. You'll likely discover "hot spots" where the signal is naturally stronger, which are almost always near windows or on a higher floor. Even a few feet can make a world of difference.
Activate Wi-Fi Calling on Your Smartphone
This is, without a doubt, the most powerful free fix you have. Wi-Fi Calling is a standard feature on nearly all modern smartphones that lets your device make and receive calls and texts using your home’s Wi-Fi network instead of the cellular network.
If you have reliable internet but lousy cell reception, this feature is a total game-changer. It completely bypasses the weak cell signal from the tower, giving you crystal-clear call quality as long as you're connected to your Wi-Fi.
Enabling it is incredibly straightforward:
- On iPhone: Head to Settings > Phone > Wi-Fi Calling and just toggle it on.
- On Android: Open up Settings, use the search bar to find "Wi-Fi Calling," and flip the switch.
Once it's on, your phone will automatically switch over whenever your cell signal is weak. It provides a seamless and reliable connection indoors without you having to do a thing.
Perform Simple Maintenance on Your Phone
Sometimes the problem isn't the signal outside, but a small glitch inside your phone itself. I've seen a few quick maintenance tasks clear things up and get the connection back on track.
Key Insight: Your phone is in constant communication with cell towers. Sometimes, that connection gets "stuck" on a weaker or more distant tower. Forcing it to find a new connection can often improve your signal strength instantly.
First, try toggling Airplane Mode on for about ten seconds, then switch it off. This simple action forces your phone to disconnect and then re-establish its link to the network, often latching onto a stronger signal in the process. You should also pop into your settings and check for any carrier settings updates, which can fix known connectivity bugs. You can find more details in our guide on adjusting 5G APN settings to make sure your network communication is optimized.
Finally, take a look at your phone case. Those thick, rugged cases—especially ones with metal components—can physically block your phone’s internal antenna and seriously degrade your reception. Try taking the case off for a bit to see if your signal bars jump up.
While these free methods are fantastic starting points, the demand for more permanent solutions is skyrocketing. The signal booster market is projected to be worth around USD 19.39 billion in 2025 and is forecasted to climb to USD 33.36 billion by 2029. This explosive growth just shows how widespread the need for consistent connectivity has become, driven by 5G expansion and the explosion of smart devices. For a deeper look at this trend, you can explore the full market research report.
Common Questions About Home Signal Boosters
When you start digging into the world of signal boosters, a few key questions always pop up. Getting straight answers is what helps you feel good about pulling the trigger on a purchase and knowing exactly what you’re getting into. So, let's break down some of the most common things people ask when they decide it's time to boost cell signal at home.
I get this one a lot: are these things even legal? The answer is a resounding yes, but with one crucial string attached. The booster absolutely must be certified by the Federal Communications Commission (FCC) in the US. Any brand worth its salt only sells FCC-certified equipment, which means it’s been rigorously tested to make sure it won’t mess with the carriers' networks.
You'll also need to register your booster with your specific cell provider. Don't worry, this is usually a free and simple process that takes just a few minutes on their website.
Will a Booster Work with No Signal?
This is a critical one. People often wonder if a booster can magically create a signal out of thin air if they have absolutely nothing to start with. The short answer is no. A signal booster is an amplifier, not a tiny cell tower. It needs some existing, usable signal outside your home to grab, amplify, and rebroadcast inside.
This is exactly why doing a signal audit with your phone's field test mode is so important before you buy anything. If you can't find even a whisper of a signal (think -120 dBm or better) anywhere on your property, a booster just won't have anything to work with.
Do Boosters Improve Data Speeds?
Absolutely, and this is a massive benefit that many people don't realize. A stronger, more stable cellular signal—which means a better dBm reading—directly translates to a faster and more reliable connection for everything you do online.
It's not just about clearer voice calls. A quality signal booster will also give you:
- Faster 4G LTE and 5G data speeds for quicker downloads and uploads.
- Smoother streaming for music and video, with way less of that dreaded buffering.
- A more reliable connection for hotspotting, video calls, and other data-hungry tasks.
Think of it this way: a booster strengthens the entire data pipeline to your phone, not just the part that handles your calls.
Finally, you might be wondering if you can install one of these yourself. The good news is that most home signal booster kits are designed with DIY in mind. If you’re comfortable with some basic handiwork, like mounting a small antenna to your roof's fascia and drilling a hole for the cable, you can definitely tackle this job yourself. But if climbing a ladder isn’t your idea of a fun weekend, professional installation services are widely available to make sure you get the best possible placement and performance.
At transitwirelesswifi, we provide expert-backed insights to help you navigate your connectivity challenges. For more tips on wireless debugging and reviews on affordable cell service, explore our resources at https://transitwirelesswifi.com.