

Canceling a phone plan can be a hassle, especially if you are unsure where to begin. I’ve been there, too, so I understand the struggle. That’s why I’m here to help guide you through the process of canceling your Cricket Wireless subscription with ease.
Overview of the Cancellation Process
| Action | Description |
|---|---|
| Step 1: Gather the required information | Gather all the necessary account information. |
| Step 2: Contacting Customer Support | Contact Cricket Wireless customer support via call (1-800-274-2538) |
| Step 3: Follow the Cancellation Steps | Verify your account information with customer support, then express your intention to cancel the account. |
| Porting Your Number (Optional) | If you want to keep your phone number, you can port it to a new carrier. |
As I tackle this process further, I’ll share some tips to help make your cancellation experience smoother.
Preparing for Cancellation
When it comes to canceling your Cricket Wireless service, preparation is key. I’ve put together a few important steps to help guide you through the process and ensure a smooth transition.
Step 1. Gather Required Information
Before you pull the plug on your service, it’s crucial that you gather the necessary information about your account. This will make the cancellation process a lot easier and also come in handy if you decide to switch to another carrier.
- Account Number: Your account number is vital information you’ll need during the cancellation process. You can find it in your online account or on your billing statement.
- Phone: It’s important to back up your phone’s data before canceling your service. This ensures that your valuable information isn’t lost during the transition.
- SIM: If you plan to bring your phone to another carrier, keep your current SIM card handy. Many carriers will require that you use their specific SIM card, but having your current one can make the process easier.
- Phones & Devices: If you have multiple phones or devices tied to your account, you’ll want to list all their relevant information. This could include make and model, device identification numbers (IMEI, MEID, etc.), and device payment plans or lease agreements.
Cancellation Process
Step 2. Contacting Customer Support

When I needed to cancel my Cricket Wireless subscription, I next contacted their customer support. Their team was quite friendly and efficient in handling my request.
If you need to reach out to Cricket Wireless customer support, you have three options:
- Call them at 1-800-274-2538
- Start a text chat through their website
- Send an email to their support team
Step 3. Follow the Cancellation Steps
Here is a simple and easy-to-follow guide on how to proceed with the cancellation process:
Communicating with Customer Service
| Stage | What to Say |
|---|---|
| Initial Contact | “Could you please confirm that my service has been canceled and when the cancellation will be effective?” |
| Verification | “Sure, my account number is [Your Account Number]. I also have other verification details ready if needed.” |
| Reason for Cancellation | “I have decided to cancel because [Your Reason – e.g., high cost, moving to an area with no coverage, etc.].” |
| Confirming Cancellation | “Could you please confirm that my service has been cancelled and when the cancellation will be effective?” |
| Post-Cancellation | “What are the next steps I need to take care of? For example, do I have any remaining balance or equipment to return?” |
Remember to maintain a courteous and patient tone during the call. They are there to assist you, and a friendly interaction can ensure a smoother process.
First, verify your account information when you contact customer support. This ensures that you’re the account owner and have the authority to cancel the subscription. Then, request account cancellation.
While speaking with the customer support rep, express your intention to cancel the account. More details about the post-cancellation actions as we go further.
Other Method: Porting Your Number
When canceling Cricket Wireless service, you might want to keep your current phone number and transfer it to a new carrier. This process is known as porting. Before initiating the porting process, it’s important for you to make sure that all your outstanding balances and payments are resolved.
To port your number to a new carrier, you’ll need to:
- Choose a new carrier and plan
- Contact the new carrier and provide them with your Cricket Wireless account information.
- Ensure that your new carrier initiates the porting process
- Wait for confirmation that the porting process is complete
Note: Cricket Wireless service will automatically cancel after the porting is complete, so you don’t need to worry about canceling it manually.
Post-Cancellation Actions
Pay Remaining Balance
After canceling my Cricket Wireless service, I had to settle any outstanding balance on my account. If pending charges or prorated fees are due, make a one-time payment to clear them. This way, I can avoid any potential issues or debts related to my canceled account.
To pay my remaining balance:
- Log in to your Cricket Wireless account
- Check the due date and amount of payments you need to make
- Navigate to the Billing section to make a one-time payment
Remember: If there’s any account credit or refunds you’re eligible for, it’ll reflect right away in your account balance.
Handling Device Returns
If you’ve recently purchased a device from Cricket Wireless, you might need to return it depending on the circumstances of your cancellation. Reviewing the return policy and following the proper procedures to avoid additional charges is important.
To handle device returns:
- Review the Cricket Wireless return policy
- Check if your device is eligible for a return
- Follow the instructions to initiate a return process
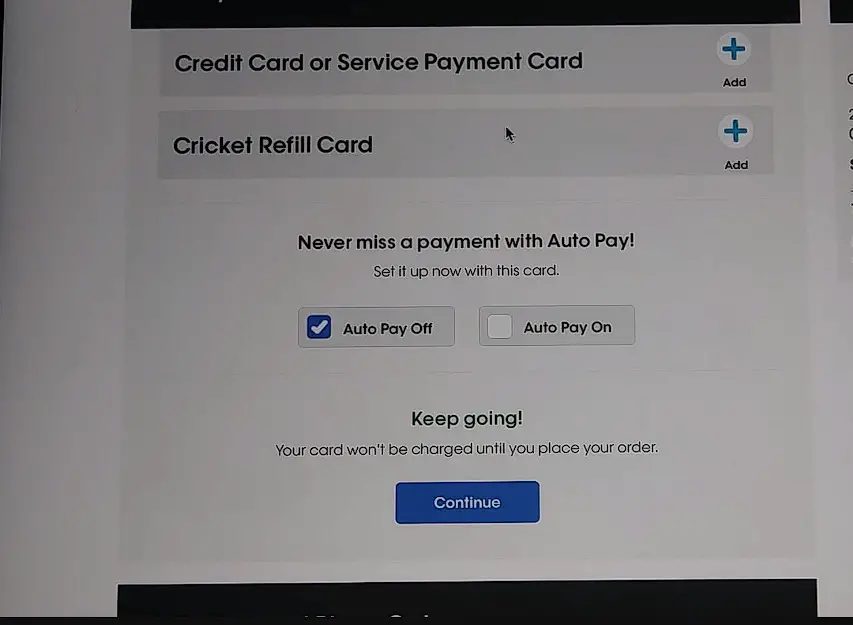
Auto Pay Termination
When it comes to canceling Cricket Wireless, one of the things you’ll need to address is terminating AutoPay. This is how I did it, and it worked quite seamlessly:
- Log in to your Cricket Wireless account online
- Access the Account Settings section
- Locate the Auto Pay option
- Select Turn Off Auto Pay
It’s essential to note that disabling Auto Pay doesn’t automatically cancel your service. However, it ensures that there will be no future automatic charges on your account.
References
Organizations:
- Federal Communications Commission (FCC). https://www.fcc.gov/
Websites:
- Cricket Wireless Contact. https://www.cricketwireless.com/contactus
- Cricket Wireless. https://www.cricketwireless.com/
- FCC Guide. https://www.fcc.gov/consumers/guides/porting-keeping-your-phone-number-when-you-change-providers
- Consumer Reports. https://www.consumerreports.org/
Video Reference
foXnoMad
Kclaudio-Leadership