In this article, I’ll share how to quickly and easily connect a wireless keyboard to your laptop.
There are generally two methods for connecting a wireless keyboard: Bluetooth and USB receivers. Also included are tips for using USB hubs/adapters if your laptop has limited USB ports or you must connect multiple devices simultaneously.
Just follow along, and you’ll have your new keyboard connected quickly!
Quick Summary of Connecting Wireless Keyboard
| Method | Steps |
|---|---|
| Bluetooth | →Turn on Bluetooth on the laptop → Activate keyboard pairing mode → Add the Bluetooth keyboard to your laptop through the settings → Select the keyboard from the list of available Bluetooth devices → Enter a PIN if prompted |
| RF Keyboard | → Locate the USB dongle/receiver → Insert the dongle into an available USB port on the laptop → Turn on the RF keyboard → Wait for the laptop to recognize the new device and confirm usage if prompted |
| USB Hub/Adapter | For a USB Hub → Plug the USB hub into a laptop’s port → Insert the keyboard’s USB receiver into the hub For a USB Adapter → Identify the type of USB port on the laptop and keyboard → Purchase a compatible adapter → Attach the adapter to the laptop → Connect the keyboard’s USB receiver to the adapter |
Preparing Your Wireless Keyboard
Insert fresh batteries (Optional): This is the first thing you should do. Check your keyboard’s packaging to see what batteries it needs, like AA or AAA. If your keyboard has a battery slot, insert the batteries as indicated.
Charge it: Don’t worry about the previous step if your keyboard uses built-in rechargeable batteries. Instead, grab the charger that came with your keyboard and let it charge for a bit before turning it on. You’ll want to have enough power for the connection process.
Locate the LED indicator: You’ll need to watch the LED light on the keyboard. This helpful little light will tell you when your keyboard is ready to connect and when it’s successfully connected. Look for it to start flashing once you hit the pairing button.
Find the on/off switch: This might seem obvious, but locate your keyboard’s on/off switch. Knowing when the keyboard is powered on and ready to connect is essential. You’d be surprised how many times I’ve forgotten to flip that switch!
Power it up: Once you’ve inserted the batteries or charged up your keyboard, turn on the on/off switch. This should activate the LED indicator, letting you know your keyboard is ready for pairing.
Now that your wireless keyboard is fully prepared and powered on, you can connect it to your laptop. Time to get typing!
Connecting a Keyboard using Bluetooth
Alright, let’s jump right into it! In this brief guide, I’ll show you how to connect a wireless keyboard to your laptop using Bluetooth. Here’s a step-by-step rundown for you to follow:
Step 1. Turn on Bluetooth on your Laptop
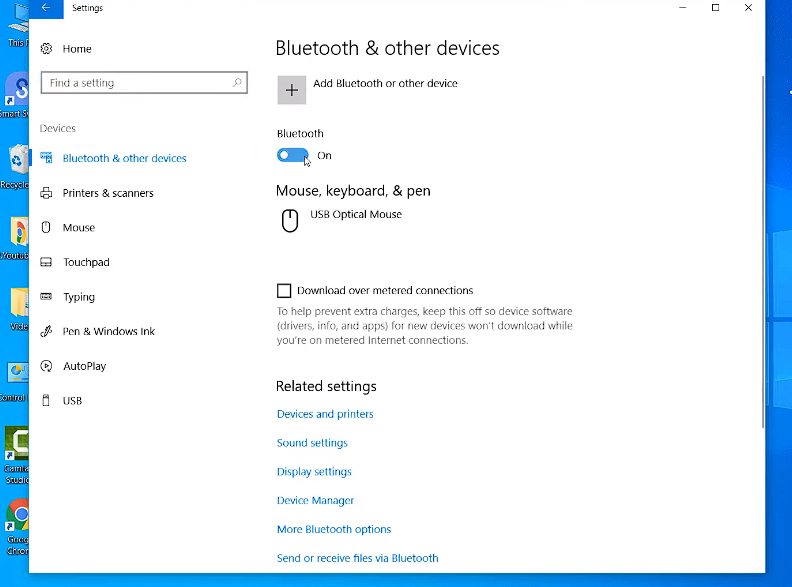
- You can do this by going to Settings on Windows 10 or Windows 11 and selecting Bluetooth & devices. Then, toggle on the Bluetooth switch.
- For Mac users, click on the Apple menu > System Preferences > Bluetooth, and turn it on.
Step 2. Put your Keyboard in Pairing Mode
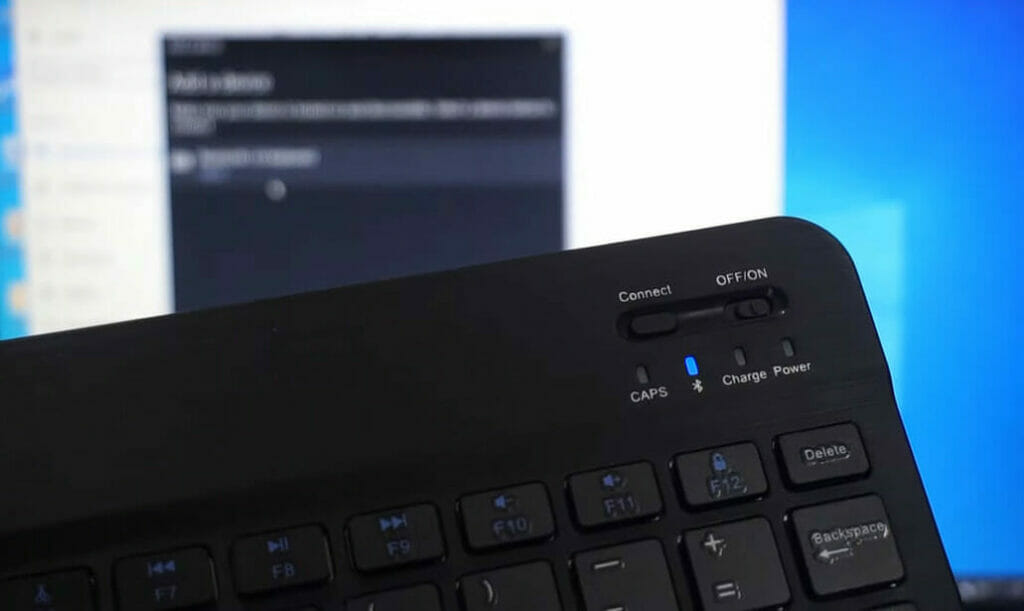
You might need to press a specific button or switch on your keyboard to activate its Bluetooth pairing mode. Usually, you’ll see a “connect” word on your keyboard. Check the user manual for instructions specific to your device.
Step 3. Add the Bluetooth Keyboard to your Laptop
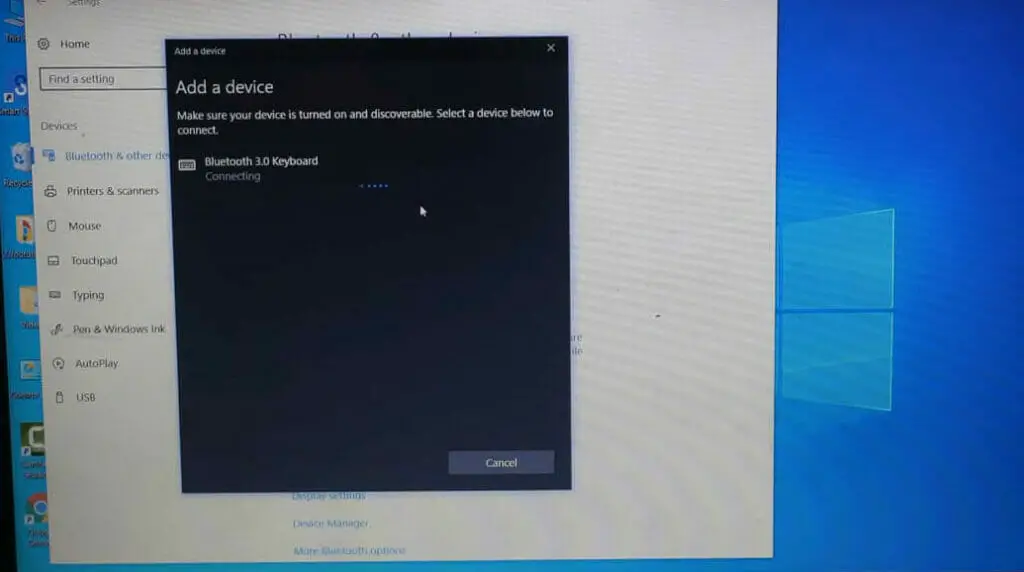
- Go to Settings > Bluetooth & other devices > Add a device> Bluetooth on your Windows laptop.
- For Mac users, go to System Preferences > Bluetooth.
In the list of available Bluetooth devices, click on the name of your keyboard to initiate the pairing process.
Step 5. Enter a PIN if Needed
Sometimes, you may be prompted to enter a PIN for the connection. If so, follow the on-screen instructions to complete the pairing process.
And there you have it! Just follow these simple steps, and you’ll be typing away on your newly connected wireless keyboard in no time.
Now that your keyboard is connected, you’ll get notifications on your Windows or Mac laptop confirming the successful pairing, and you’re all set to start using your wireless keyboard more efficiently and comfortably!
Connecting an RF Keyboard
RF keyboards are a popular choice for wireless connectivity, and setting one up is a breeze. Let me walk you through connecting an RF keyboard to your laptop.
These keyboards use a dongle, a wireless receiver, or a USB receiver to connect to your laptop.
Step 1. Locate the Dongle
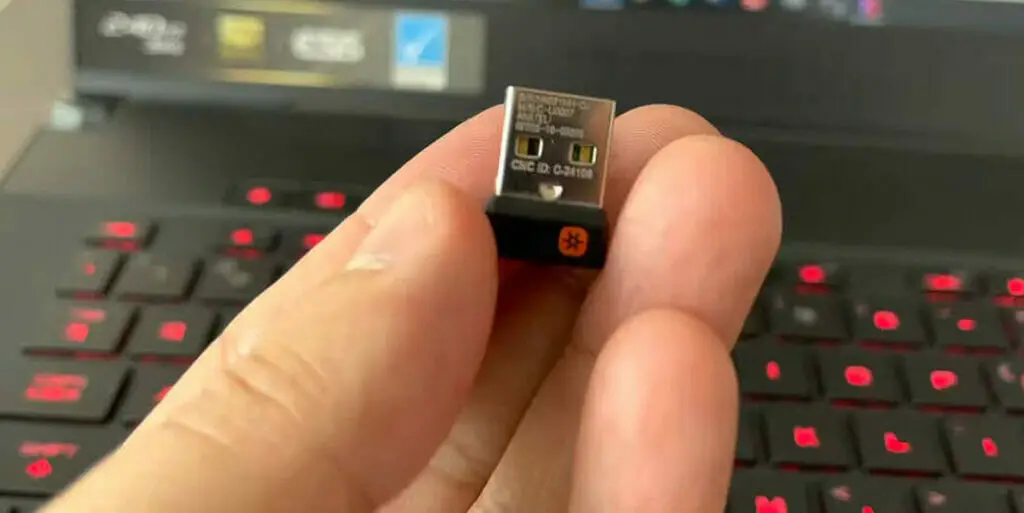
You’ll first want to locate the dongle, often tucked away in the keyboard’s packaging or the battery compartment.
Step 2. Find an Available USB Port and Plug the USB Receiver into the Chosen Port
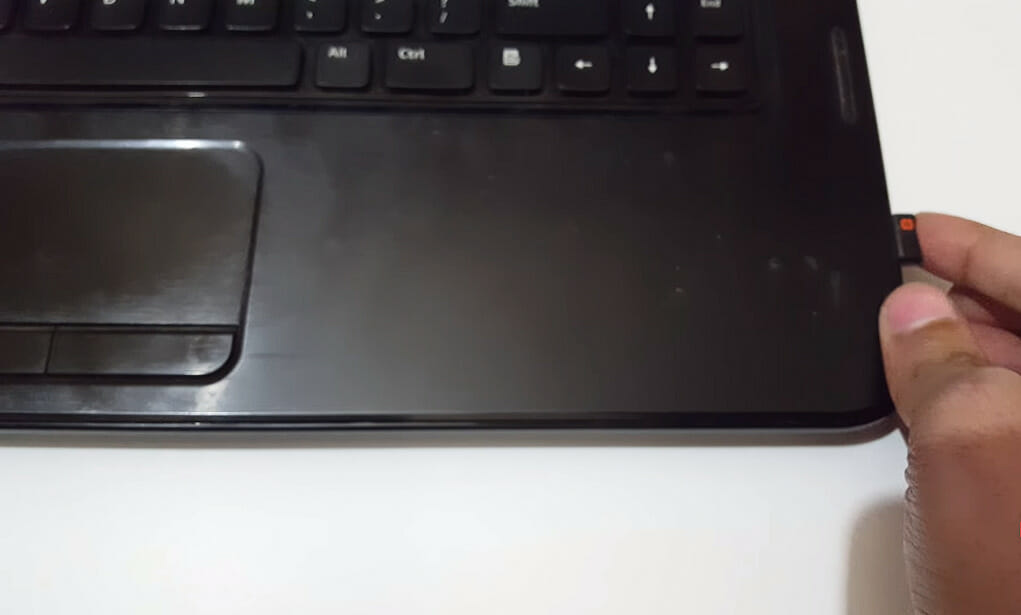
Make sure it fits snugly and sits firmly in place.
Step 3. Turn on your RF Keyboard
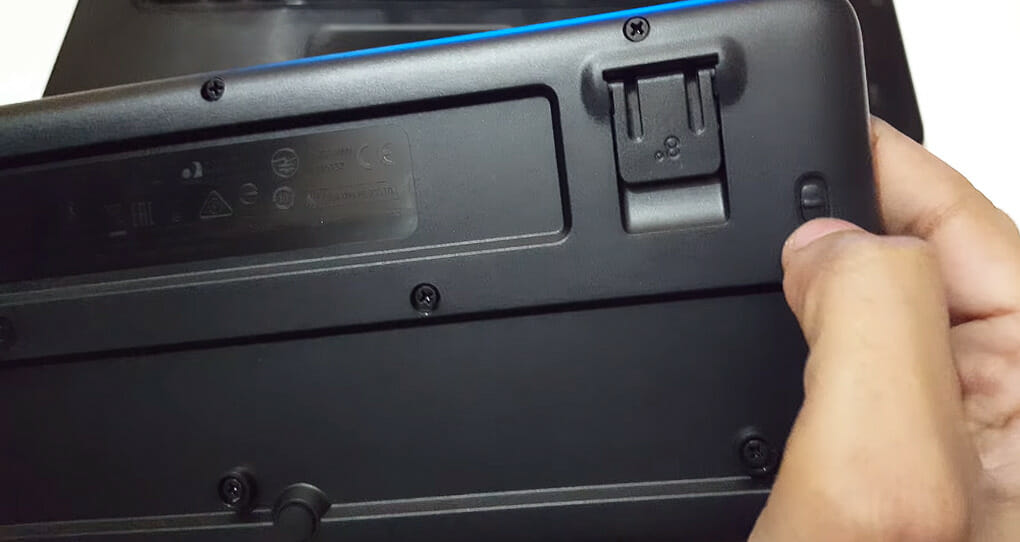
There should be an on/off switch on the bottom or side of the keyboard.
Now, wait for a moment as your laptop recognizes the new device. You might see a popup window asking you to confirm the usage of the new device. Confirm, and you’re good to go!
Occasionally, your keyboard might come with a setup disc to help with installation. If so, insert the disc into your laptop and follow the on-screen prompts to complete the installation.
Don’t worry if your laptop doesn’t have a built-in Bluetooth adapter, as you can still use an external USB Bluetooth adapter with your RF keyboard.
These adapters are widely available online or in tech stores and are easy to use. Just plug the adapter into a USB port, which automatically detects and connects to your RF keyboard.
Using an External USB Hub or Adapter
Let me start by discussing an efficient way to connect a wireless keyboard to a laptop: using a USB hub or an adapter. This method is perfect if the laptop has limited USB ports or you must connect multiple devices simultaneously.
USB hubs are handy devices that can make our lives a lot easier. They usually have multiple USB ports, allowing us to connect various devices, such as a wireless keyboard simultaneously. Connecting a wireless keyboard through a USB hub is quite easy. Here’s a quick step-by-step guide:
Step 1. Find a suitable USB hub with enough available USB ports
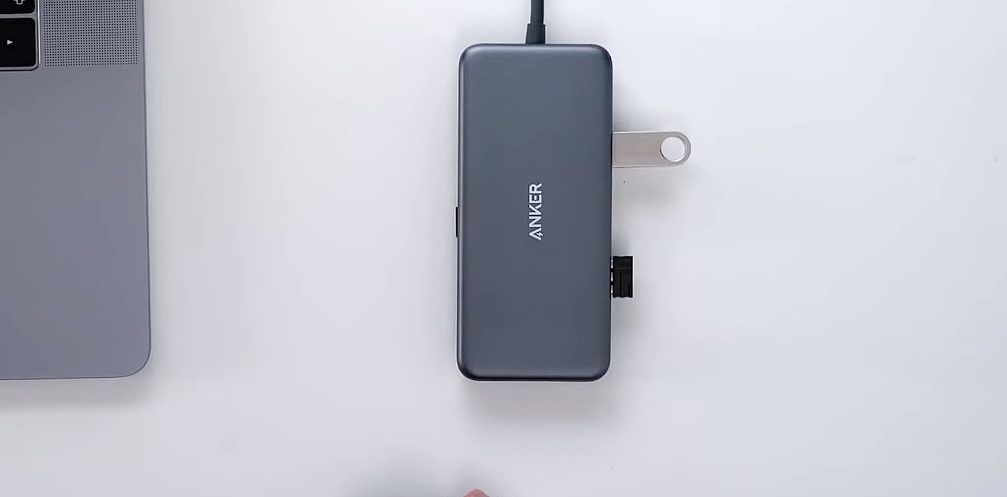
Step 2. Plug the USB hub into one of the laptop’s USB ports
Step 3. Insert the USB dongle or receiver of the wireless keyboard into an empty port on the hub
On the other hand, if your laptop lacks an appropriate USB port, a USB adapter may be a great solution. For instance, older laptops might have a “Type-A” USB, while your wireless keyboard requires a “Type-C” USB.
Don’t worry; an adapter can bridge this gap. To connect your wireless keyboard through an adapter, you can follow these simple steps:
Step 1. Identify which type of USB port your laptop and keyboard use
Step 2. Purchase a USB adapter compatible with both types
Step 3. Attach the adapter to your laptop and the keyboard’s dongle or receiver to the adapter
In either case, a friendly reminder is to ensure that your wireless keyboard drivers are installed on your laptop. Your laptop may automatically recognize the keyboard, but if it doesn’t, check the keyboard manufacturer’s website for the necessary drivers.
And there you have it! A USB hub or a USB adapter will help you connect a wireless keyboard to your laptop efficiently, even when facing hardware limitations. Get ready to type away comfortably with your new wireless keyboard setup!
Troubleshooting Connection Issues
Connectivity Issues
Sometimes, connecting a wireless keyboard to a laptop can be tricky. I’ve faced this issue a few times, which can be frustrating. But don’t worry; let’s go through some steps to troubleshoot the connectivity issues.
- Make sure the keyboard is turned on: Check if there’s a power switch on the keyboard and ensure it’s on.
- Enable Bluetooth on your laptop: In Windows, click on the Network, Sound, or Battery icons in the taskbar, and ensure the Bluetooth setting is turned on.
- Pair your keyboard with your laptop: Follow the on-screen instructions provided by your keyboard manufacturer for pairing.
If you’re still having trouble, reinstalling the keyboard driver may be a good idea. Head to the manufacturer’s website, download the latest driver and follow the installation instructions. This should resolve most connectivity issues.
Hardware Issues
In some cases, the problem may lie with the hardware. Let’s take a look at some of the common hardware-related issues and their solutions:
- Battery problems: If your wireless keyboard uses replaceable batteries, ensure they’re fresh. Weak or dead batteries can often be the cause of connection issues.
- USB port issues: Connect a wireless keyboard with a USB receiver to different USB ports on your laptop. A faulty USB port could be the culprit.
- Interference from other devices: Ensure no other electronic devices nearby that could cause interference with the wireless connection. This includes USB 3.0 ports and devices, as they can cause interference with the 2.4GHz wireless signals used by some keyboard models.
If none of these steps help, it’s possible that your keyboard may be faulty. Before jumping to conclusions, try connecting the same keyboard to another laptop or computer. If you experience the same issues, it’s time to consider a replacement or reach out to the manufacturer’s support.
By following these steps, I hope you’ll be able to resolve any connection issues you’re facing with your wireless keyboard. Patience and a systematic approach are the keys to solving any problem.
References
Organizations:
- Bluetooth SIG. https://www.bluetooth.com/
- The USB Implementers Forum (USB-IF). https://www.usb.org/
Websites:
- PCMag. https://www.pcmag.com/
- Lifewire. https://www.lifewire.com/
- Windows Central. https://www.windowscentral.com/
Video References
Cap Trong Nam – How To
STEM Activities
Gadget Lover

