
Ready to master the art of setting up your APN for Assurance Wireless? Don’t sweat it—I’ve got your back.
Key Takeaways – There is a simple 3-step process: navigate to settings, dive into APN settings, and enter or edit APN details based on the APN settings provided below or your carrier’s provided information. (Note: Actual Input Settings are at the bottom of the article.)
Let’s dive into the detailed walkthrough!
How to Effectively Set Up Your Assurance Wireless APN on Android
Setting up an APN on an Android might sound techie, but it’s like rearranging your living room—all about finding the right place for everything.
Step 1: Navigate to the Settings Menu
Fire up your Android and tap the gear-shaped ‘Settings’ icon, which might hang out in your app drawer. Once you’re in, scroll down until you find ‘Mobile Networks’ or ‘Connections’ (depending on your device).
Step 2: Dive into APN Settings
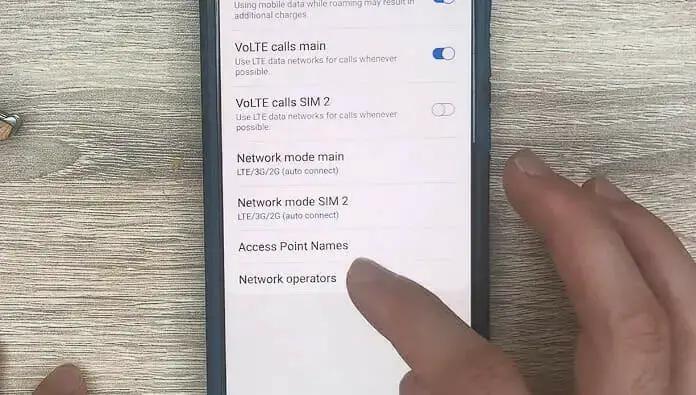
Once in ‘Mobile Networks,’ look for ‘Access Point Names’ or just ‘APNs.’ This is where the magic happens. Tap on it, and you’ll usually see a list of preset APNs or maybe just one, depending on your carrier and region.
Step 3: Enter or Edit APN Details
If starting from scratch, look for the ‘Add’ or ‘+’ icon at the top right. If editing, tap on the APN name. Here, you’ll key in the details provided below. Ensure each field is correctly filled. Once done, save and exit. Voila, you’re connected!
Assurance Wireless Main APN Settings
| Field | Value |
|---|---|
| Name | Assurance |
| APN | internet |
| Username | (Leave it blank) |
| Password | (Not set – Leave it blank) |
| Proxy | (Not set) |
| Port | (Leave it blank – not set) |
| Server | (Not set – Leave it blank) |
| MMSC | (Leave it blank) |
| MMS Proxy | (leave blank) |
| MMS Port | (Not Set) |
| MCC | 470 |
| MNC | 2 |
| Authentication type | (none) |
| APN type | default, fota, mms, supl |
| APN protocol | IPv4/IPv6 |
| APN roaming protocol | IPv4/IPv6 |
| APN enable/disable | enabled |
| Bearer | (Unspecified) |
| Mobile virtual network operator | (none) |
How to Effectively Set Up Your Assurance Wireless APN on iPhone
Hey there, iPhone users! Setting up an APN here is like picking the right paint color—it’s all about the details. So, grab that phone, and let’s dive in.
Step 1: Open Settings
Find that silver gear icon labeled ‘Settings.’ It’s probably hanging out on your home screen. Tap on it and get ready to explore.
Step 2: Find the Cellular/Mobile Section
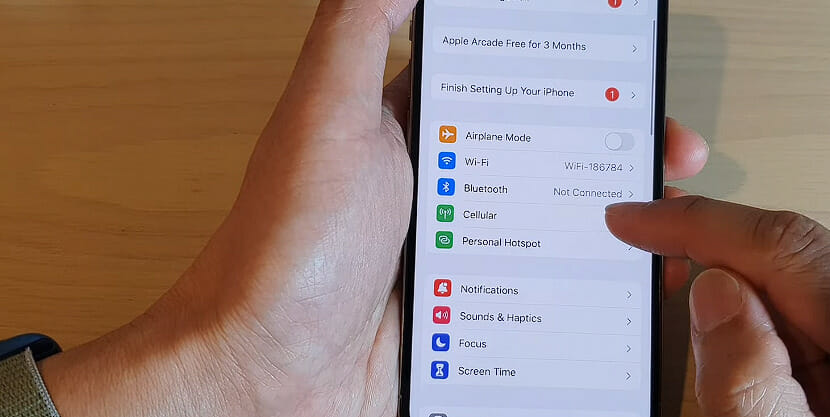
Inside settings, look for ‘Cellular’ or sometimes ‘Mobile.’ Tap into it and then again on ‘Cellular Data Options’ or ‘Mobile Data Options.’
Step 3: Tinker with the APN Settings
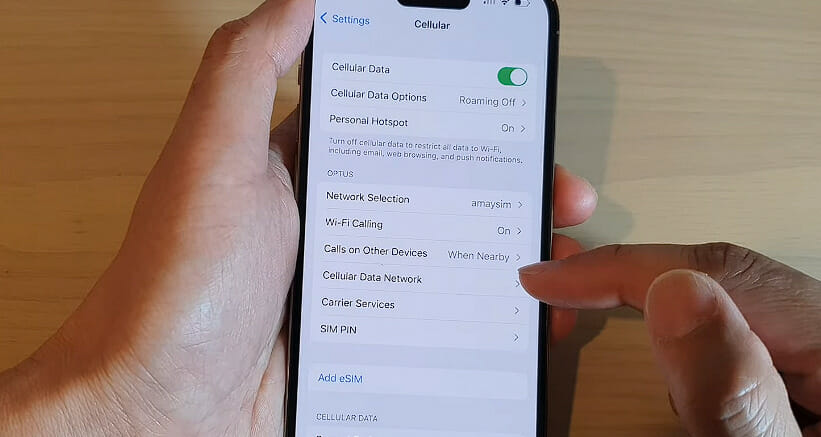
Here comes the fun part. Tap on ‘Cellular Data Network’ or ‘Mobile Data Network.’ You should now see the APN settings. Fill in the details provided below.
Make sure everything’s in the right field. Once done, go back, and your settings are automatically saved. Boom! Connection achieved!
Cellular Data Settings For Assurance Wireless:
| APN | internet |
| Username | Leave It Blank |
| Passwords | Blank & Not Set |
LTE Setup Settings For Assurance Wireless:
| APN | internet |
| Username | Blank |
| Passwords | Blank |
MMS Settings For Assurance Wireless iPhone:
| APN | wap |
| Username | Blank |
| Passwords | Blank |
| MMSC | unchanged |
| MMS Proxy | unchanged |
| MMS Message Size | unchanged |
| MMS UA Prof URL | unchanged |
Tips for Troubleshooting Assurance Wireless APN-Related Issues
Alright, sometimes even the best laid-out plans hit a snag. But fret not regarding APN-related hiccups; it’s like patching up a wall; it’s fixable with some effort.
Tip 1: Double-check your Details
Mistakes happen. Maybe a digit’s off, or perhaps a setting’s been overlooked. Revisit the APN settings and compare them with the details provided. Ensure everything aligns perfectly.
Tip 2: Reset to Default
If things get too messy, sometimes it’s best to start fresh. In your APN settings, there’s usually an option to ‘Reset to default’ or ‘Restore default settings.’ Once reset, re-enter the APN details.
Tip 3: Restart the Device
The classic move – turn it off and on again. It’s surprising how many issues this simple trick can fix. Give your device a momentary break, power it off, count to ten, and power it back on. Check if the connection is restored.
Remember, every device, just like every home, has its quirks. But with a little patience and know-how, you’ll have your APN running smoothly in no time!
References
Organizations:
- GSMA. https://www.gsma.com/
Websites:
- Android Authority. https://www.androidauthority.com/
- Apple Support. https://support.apple.com/
- Google Fi Wireless Help. https://support.google.com/fi/?hl=en
- How-To Geek. https://www.howtogeek.com/
Video References:
APN Settings
Alfve